Primary keyword: paver tripping hazardsVariants: uneven paver surfaces, outdoor paver safety, paver walkway hazards
Audience: Homeowners, property managers, business owners in Orlando/Central Florida seeking safer, attractive outdoor spaces.Pain/Benefit: They want to avoid accidents, reduce liability, and maintain lasting curb appeal.
Falls and trips are not only painful but can be costly and cause lasting issues. In our work at GCM Best Services across Orlando and Central Florida, we’ve seen how common—and preventable—these tripping hazards are. We want to share what we’ve learned so anyone considering or maintaining paver surfaces knows what to look for, and how to keep walkways, patios, and driveways safe, smooth, and beautiful.
We’ll review the main signs of tripping hazards, why they occur, and the best ways to prevent them. Let’s make sure your paver projects are welcoming rather than risky.
Outline of what we’ll cover
- Why paver tripping hazards matter
- How common are falls on outdoor pavers?
- The main types of tripping hazards in pavers
- What causes paver surfaces to become uneven?
- Key signs to look for: spotting hazards like a pro
- Design choices to reduce tripping risks
- Inspection tips: how we check paver safety
- When to repair versus when to replace
- Best practices for safe paver installation
- Drainage and maintenance for long-term safety
- Who is most at risk from uneven pavers?
- What local codes and standards apply?
- Conclusion and next steps
- Frequently asked questions
Walk with confidence, not caution.
Why paver tripping hazards matter
At first, a small bump or gap in your pavers might seem harmless. But as we’ve seen in customer stories and public safety reports, a barely raised edge or a hidden loose brick can become a real risk. It’s more than inconvenience. Trip hazards can lead to painful injuries, especially for older adults, children, and anyone with mobility concerns. In a public or commercial setting, these hazards can also open the door to insurance claims or legal trouble.
Paver walkways, driveways, and patios are meant to be inviting spaces, not obstacle courses. That’s why creating—and maintaining—a level, safe paver surface is one of the most valuable things you can do for your home or business. When we help customers avoid tripping risks, we’re not just protecting property. We’re protecting people.
How common are falls on outdoor pavers?
According to a study published in the American Journal of Public Health, 58% of outdoor falls among middle-aged and older adults take place on sidewalks, curbs, and streets. That’s more than half. The message is clear: problems with outdoor surfaces, including pavers, are a primary factor in many injuries.
In our work, we regularly meet people who have tripped on misaligned or uneven pavers. The outcome? Skinned knees, sprained ankles, broken wrists, and sometimes worse. The risk is even higher when kids run barefoot or when rain and leaves hide raised edges.
Every uneven paver is a step toward an avoidable accident.
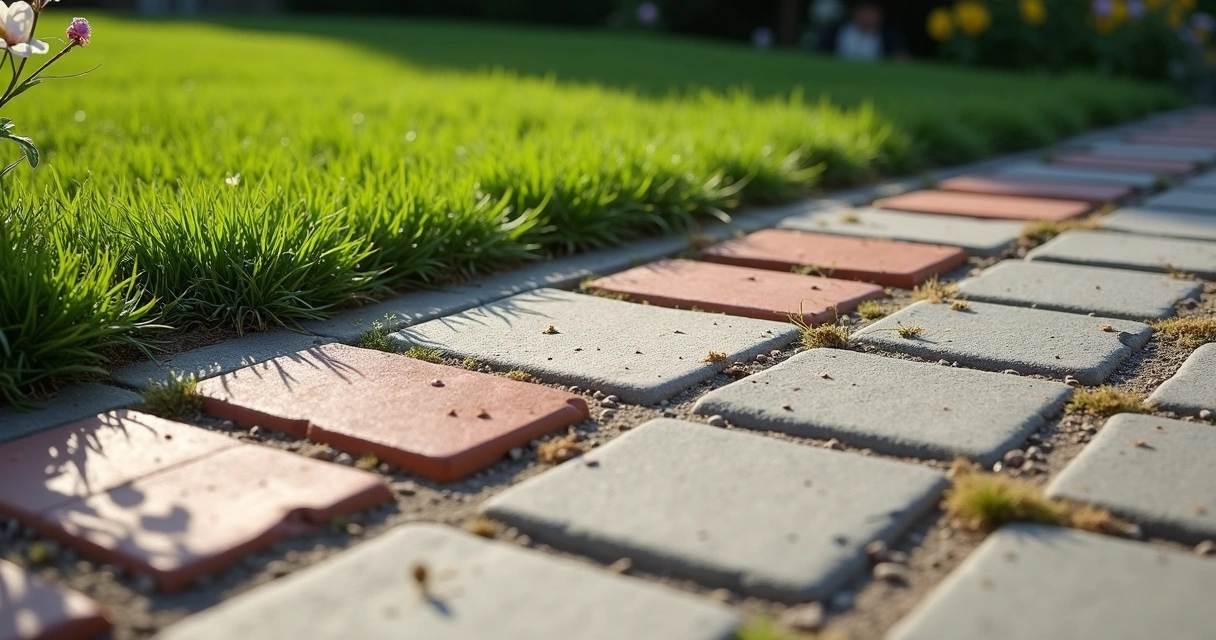
The main types of tripping hazards in pavers
Spotting a tripping hazard starts with knowing what to look for. Over the years, we’ve seen several repeat offenders:
- Raised or sunken pavers: Any paver standing higher or lower than the ones next to it becomes a ‘lip’—an instant trip risk.
- Loose pavers: Bricks that shift underfoot can catch toes and surprise unsuspecting walkers.
- Wide joints or missing sand: Gaps between pavers cause instability and become snag points, especially for heels, canes, or wheels.
- Damaged or cracked pavers: Broken pieces can move, tilt, or create sharp edges that catch on shoes.
- Sloped or slanted areas: Poor drainage or settling can send water under the pavers, causing them to tilt and creating unevenness.
- Overgrown edges: Weeds and roots push pavers up or apart. Loose soil also creates drop-offs at the edges.
These issues combine. For example, a raised paver may also have a broken edge and a gap filled with weeds—hitting the tripping trifecta.
What causes paver surfaces to become uneven?
The reasons why hazards appear are as varied as our Central Florida soil. Sometimes, the problem starts during construction with shortcuts or missed steps. Sometimes, weather and time are to blame. Here’s what we most often see at GCM Best Services:
- Poor base preparation: If the sub-base isn’t deep enough or well-compacted (we generally recommend 6-8 inches in Florida), pavers settle and shift.
- Lack of edge restraints: Without proper edging, pavers can migrate outward, creating curves and dips—especially on driveways and walkways.
- Drainage issues: Water pooling or running beneath the surface erodes the base, causing pavers to drop or tilt.
- Root intrusion: Nearby trees and shrubs can send roots under the pavers, lifting and breaking them from below.
- Heavy loads: Driving or placing heavy objects on surfaces not designed for them can crack or push pavers out of alignment.
- Normal wear: Even with good installation, freeze-thaw cycles, and soil movement over years may cause some settlement.
Prevention starts before the first paver is placed, and so does long-term safety. That’s why we focus not just on appearance but solid groundwork in every project we complete.
Key signs to look for: spotting hazards like a pro
Some paver tripping hazards are totally visible; others sneak up until they cause problems. We use several methods to spot hazards before they result in falls:
- Look for height differences: Slower walks down the path or driveway let us spot any bricks sticking up or sinking.
- Feel the surface: Running a broom or a straightedge across pavers often reveals slight rises or dips not obvious to the eye.
- Check the joints: Are gaps wide? Has the sand eroded or washed away? Is grass poking through?
- Inspect edges: We pay attention where pavers meet grass, concrete, or mulch. Drop-offs, slanting, or loose bricks at the edge mean trouble.
- Watch for sinking or pooling: Even a small dip or puddle after a rain signals a bigger problem under the surface.
- Look for movement: If a paver wiggles under pressure, it’s best to repair it now, before it becomes a bigger hazard.
Little issues become big hazards if ignored.
Design choices to reduce tripping risks
We always advise our customers in Orlando to plan paver layouts that prioritize walkability and safety from the start. Here are approaches we use to keep outdoor spaces both stylish and safe:
- Choose uniform paver thickness: Consistent height among all pavers cuts out sudden bumps underfoot.
- Select non-slip textures: Broom, exposed, or textured finishes provide grip, especially after rain.
- Lay pavers with tight, filled joints: Small, well-packed joints “lock” bricks in place and reduce gaps.
- Add lighting along paths and edges: Proper night lighting helps everyone spot subtle changes in elevation.
- Design with gradual transitions: Slopes, ramps, or step-downs should be gentle and clearly marked.
We think one of the most overlooked steps is adding strong edge restraints and matching the design to site conditions. Design can prevent the majority of tripping risks before they arise. It’s an investment that pays off in peace of mind.
For patios and driveways, see our driveway and patio paving solutions for more on safe design choices.
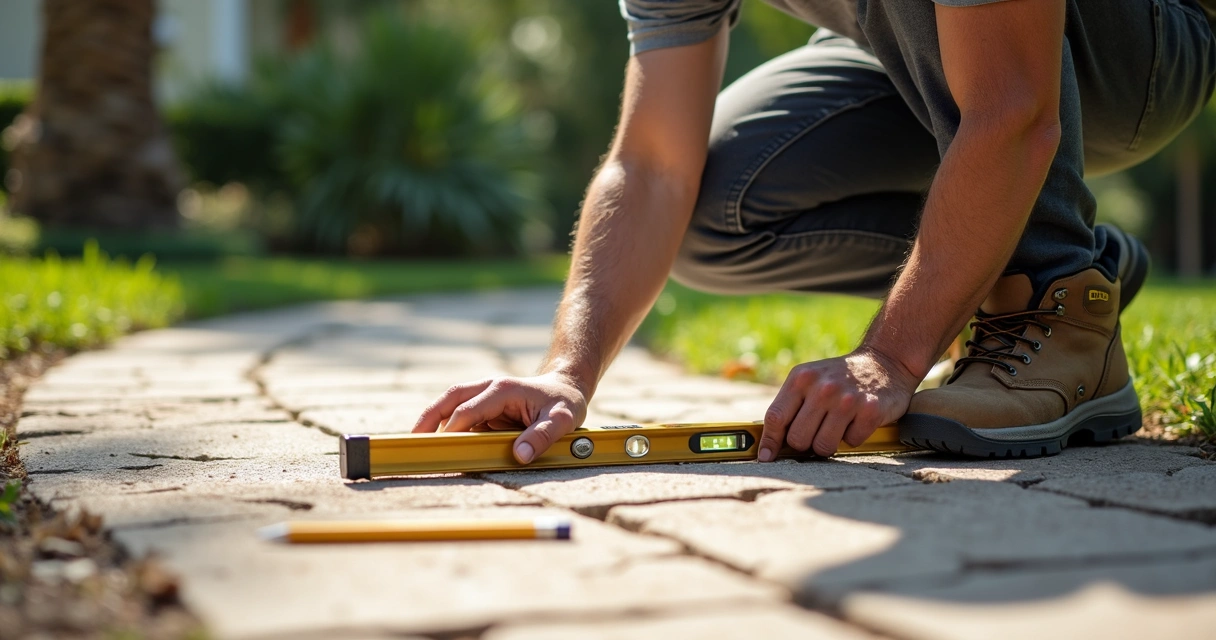
Inspection tips: how we check paver safety
Inspecting your paver surfaces doesn’t demand special gear, just a careful eye and a methodical approach. In our experience, doing this twice a year—after the heavy summer rains and again before the holidays—catches most early problems. Here is how we typically do it:
- Visual scan: Walk every path slowly, looking closely for height differences, cracks, or missing pavers.
- Straightedge test: Run a 4-foot level or a long, rigid board across the pavers. Any spot where one brick is 1/4 inch or more above the rest deserves attention.
- Look at edges and curves: Areas near flower beds, lawns, or driveways are most likely to shift first.
- Check for moss, algae, or weeds: Green growth signals drainage or joint problems.
- Feel for movement: Step on suspicious pavers. If one rocks or tilts, mark it for fix.
If you want to prevent other long-term risks—like weed invasion—see our guide on how to keep weeds from growing between pavers in Orlando, FL.
When to repair versus when to replace
Sometimes, a quick fix brings a paver surface back to safety. At other times, the whole area may need more significant rehab. We usually repair if:
- 1-4 pavers are raised, sunken, or loose but the base is solid
- Gaps have appeared but the surrounding pavers remain level
- Minor cracks or chips don’t affect structural stability
Replacement or a larger repair is the better call if:
- The issues stretch across more than 20% of the surface
- There is widespread drainage or sub-base failure
- Many bricks are broken, missing, or cannot be re-leveled safely
Timely attention to a small problem is almost always the safest and most affordable route. In our experience, waiting only invites bigger headaches and higher repair costs later.
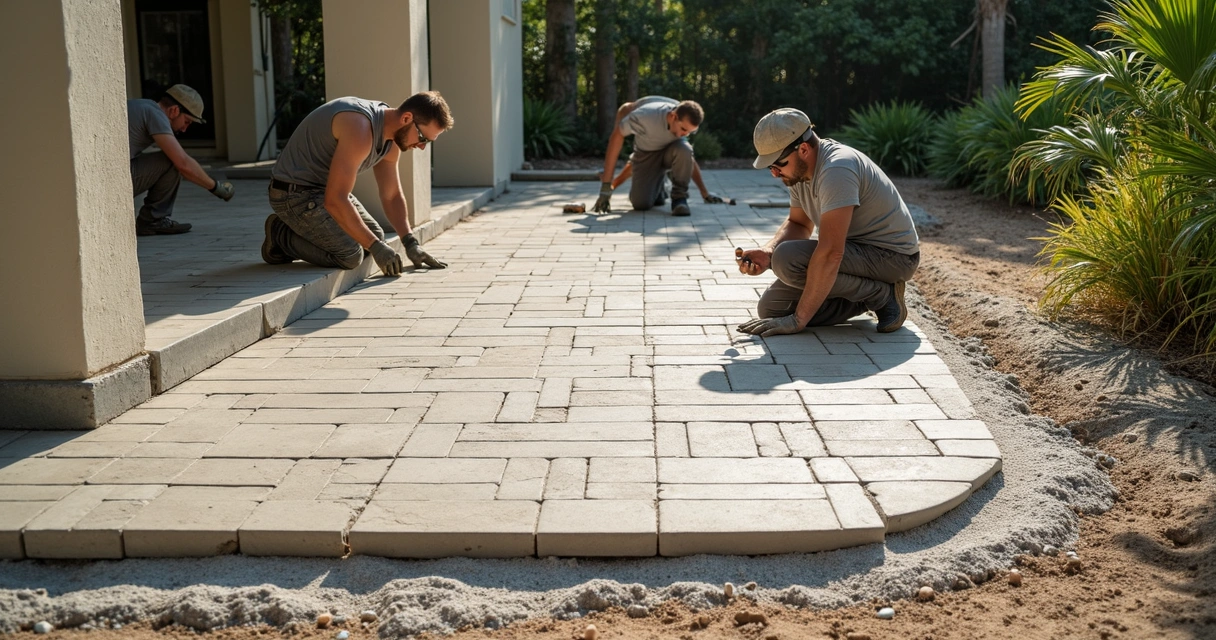
Best practices for safe paver installation
It’s no accident that GCM Best Services and similar professionals prioritize proper installation—it prevents nearly every paver hazard described above. Here’s what we do to ensure a safe, even walkway or patio from the ground up:
- Thorough base prep: Dig deep enough for expected weight and drainage. Compact base gravel in 2″ lifts for real stability.
- Install edge restraints: Rigid paver edging keeps rows locked together and prevents migration.
- Use quality bedding sand: A uniform, compacted sand layer cushions pavers and levels out minor subsurface wiggles.
- Lay pavers snugly: Tight placement and random staggering prevent pattern separation over time.
- Vibrate and sweep in sand: We sweep polymeric sand into joints, then use a plate compactor to set everything securely.
We also find it vital that drainage slope is built into every surface, so water flows off instead of pooling. For deeper guidance, our article on effective drainage for pavers in Florida covers this in detail.
Drainage and maintenance for long-term safety
Even a perfect paver install won’t last without attention to drainage and routine care. In Central Florida, sudden storms, hurricanes, and tree roots can all undermine your hardscape if ignored. Our recommendations for every customer:
- Keep gutters and downspouts aimed away from paver surfaces
- Regularly sweep and refill joints with polymeric sand as needed
- Promptly remove moss, algae, and weeds
- Watch for water pooling and correct it with added drainage or by resetting the grade
- Trim encroaching roots and grass
- Reseal edges and joints every few years
This kind of care prevents future unevenness and keeps paths looking sharp. See our guide to preventing cracks and damage in Central Florida for proven techniques. For more ambitious projects, we offer hardscape design and installation to integrate drainage directly from the start.
Who is most at risk from uneven pavers?
Tripping hazards impact everyone, but some people are more at risk than others. Based on outdoor falls research and our own local experience, we know that:
- Older adults and seniors are more likely to trip and suffer serious injuries like hip fractures
- Children, who run or play without watching the ground, are easily caught off-balance
- Anyone with limited vision, poor balance, or mobility aids (walkers, crutches, canes) is more susceptible
- People rushing in low light can miss subtle surface changes
When planning or inspecting paver walkways, consider who uses them. Smooth, even, well-lit surfaces are the safest for all.
What local codes and standards apply?
In Orlando and throughout Central Florida, safe paver installations must meet several codes and guidelines. These usually include:
- ADA (Americans with Disabilities Act) for slope, transitions, and surface roughness in public/commercial settings
- State and city building codes, which define proper base prep, drainage, and setback distances
- HOA and community standards, which may dictate edging, height, and style
We always recommend reviewing local regulations before starting a project. At GCM Best Services, we handle permits and coordinate with cities and HOAs as part of every project, to ensure your walkways and patios work for everyone and meet all rules.
Conclusion and next steps
If you’re a homeowner or property manager in Orlando, paver tripping hazards are not just a maintenance issue—they’re a safety one. Level, properly installed, and well-maintained pavers improve both curb appeal and peace of mind. You don’t need a professional to spot small hazards or take simple action—but you do need expertise and a strategic approach for lasting repairs and upgrades.
At GCM Best Services, these are the principles we build by every day. Whether you’re considering a new patio, need repairs to an old walkway, or want advice on preventing hazards, our experience covers it all. Ready for a professional quote? 📞 (407) 250-1948 • 24–48h • Orlando, Tampa & area.
Want to learn more? Explore our tips for avoiding cracks in concrete patios and all types of hardscape upgrades. We’re here to make your outdoor space safe, gorgeous, and hassle-free for years to come.
Frequently asked questions
What are common tripping hazards in pavers?
The most common tripping hazards in outdoor paver installations include: raised or sunken pavers, loose pavers that rock or shift underfoot, wide joints or missing joint sand, broken or cracked pavers, poorly sloped transitions, and encroaching vegetation or roots that push or lift pavers over time. Even small misalignments can cause accidents if overlooked.
How to check pavers for safety issues?
Inspect your paver surface by walking slowly and paying close attention to height differences, gaps, and loose bricks. Use a long straightedge to check for any pavers sticking up or down more than 1/4 inch compared to adjacent stones. Step on suspect pavers to test for rocking or movement. Also, look for signs of erosion, pooling water, or weed growth, which often signal developing hazards. Regular checks—twice a year, or after heavy rains—catch problems early.
What causes uneven paver surfaces outside?
Uneven paver surfaces typically result from poor base preparation, lack of edge restraints, drainage problems, root intrusion, and heavy load impacts. Over time, even well-laid surfaces can shift from soil settlement, weather effects, freeze-thaw cycles, or erosion under the base. Addressing the root cause—be it insufficient compaction, water management, or outside forces—prevents repeat issues.
How can I fix raised paver edges?
To fix raised edges, lift the affected paver and adjust the bedding sand or gravel beneath to reset it level with surrounding stones. Remove grass, roots, or debris causing the lift. Add or tamp the sub-base as necessary, then return the paver securely. Refill joints with sand and compact if needed. If the problem is widespread or recurring, a full reset of the edge restraint or underlying base may be necessary for stability.
Are there standards for safe paver installation?
Yes, several standards guide safe paver installation, including building codes, ADA guidelines for accessibility, and municipal or HOA rules on base thickness, slope, and transitions. Generally, surfaces should be stable, firm, and slip-resistant, with minimal height differences and properly compacted bases. In public and commercial spaces, compliance ensures both safety and liability protection. Professional installation also helps guarantee all safety and code requirements are met.