Patios and driveways should shed water, not collect it. When they don’t, low spots can form, capturing rain and creating puddles. In Central Florida—where sudden downpours, sandy soils, and sun all play their part—these puddles aren’t just annoying: they undermine surfaces, accelerate damage, and create safety hazards. At GCM Best Services, we know the frustration of carefully built concrete or brick projects developing dips over time.
We’ll guide you, step by step, through diagnosing and fixing low spots in patios or driveways. The solutions here are practical, accessible, and aligned with techniques we use ourselves across Orlando and Central Florida. Some fixes are simple enough for do-it-yourselfers; others may need professional support, especially where drainage or structural concerns arise.
Small repairs, big difference.
Understanding low spots: why they form and what is really at stake
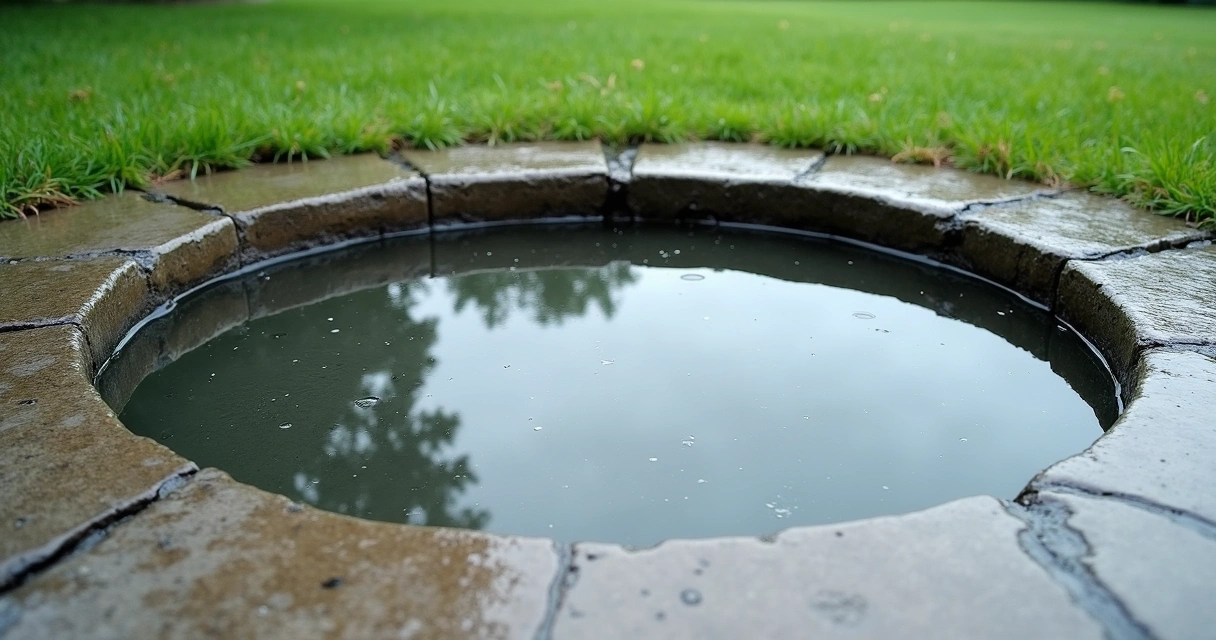
A “low spot” is just what it sounds like—a little dip where water collects instead of draining away. Over time, this can cause surface stains, cracks, algae, foundation softening, or even trip hazards.
- Poor soil compaction, especially over Florida’s sandy base, causes surface settling over the years.
- Insufficient drainage or slope lets rainwater stay where it shouldn’t.
- Tree roots, heavy vehicles, or erosion may physically push up or shift sections of your patio or driveway.
- Improper materials or installation shortcuts will show themselves as years pass.
Water is persistent. It finds weaknesses, seeps into cracks, and slowly erodes structural integrity. We see this often during our assessments for concrete repair projects around Orlando.
Checking your patio or driveway for low spots
The first step is to find and measure those low spots. Sometimes they show as obvious puddles after a rain; other times, they’re subtle. We often do these checks right after storms, when imperfections are easiest to see.
- Visual inspection: Look for any standing water, algae growth, or dark patches during or just after rain.
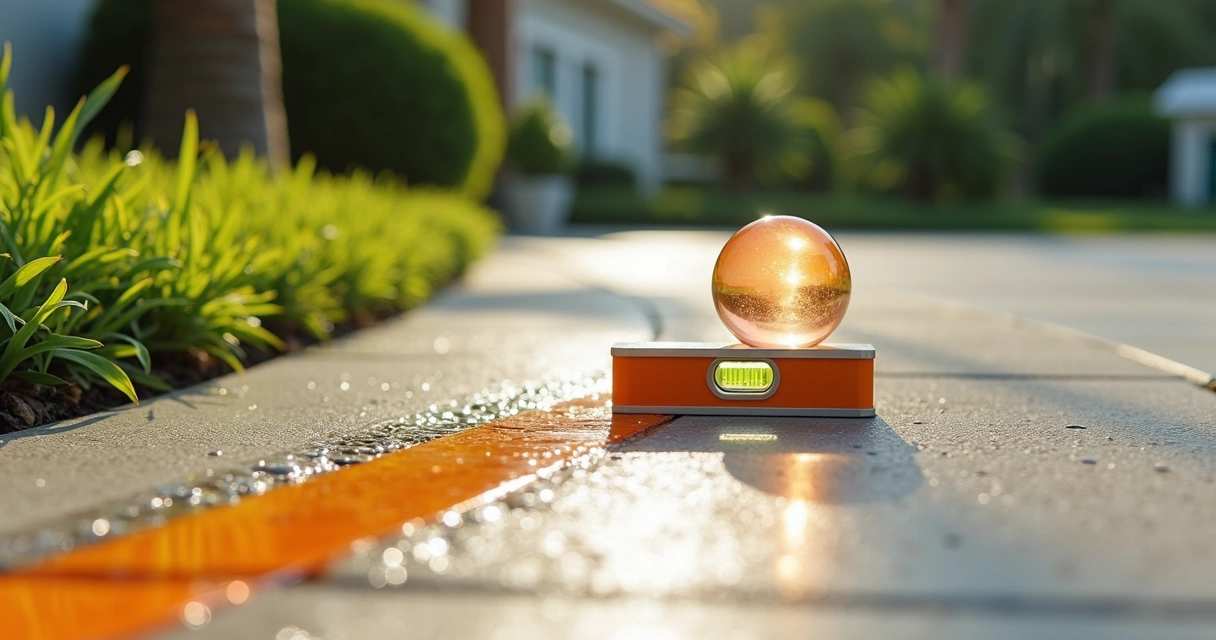
- Straightedge method: Lay an 8-foot level or straight board over suspicious areas. Gaps of more than 1/4 inch beneath the board indicate a dip.
- Chalk test: For pavers or textured surfaces, outline the puddle’s borders with chalk after rain, then assess after the surface dries.
- Mark the trouble spots: With marking paint or tape, circle areas that need work before they dry out and become invisible again.
Awareness is the first fix.
Deciding when to DIY and when to call for help
Not all low spots demand the same solution. Sometimes a little patching is enough; but if an area is sinking, very wide, or getting worse, there could be a deeper problem below the surface.
- Slight dips (less than half an inch deep and under two square feet) can often be handled with simple patching or resurfacing.
- Larger or deeper depressions, recurring cracks, or rapid spreading usually point to sub-base issues, root interference, or drainage failures—these may call for professional repair and warrant longer-term intervention as seen in the FHWA Long-Term Pavement Performance (LTPP) guidelines.
If there’s uncertainty, or you notice other symptoms like significant cracks, poor drainage nearby, or surrounding surface movement, professional assessment (like our free on-site visits at GCM Best Services) adds security and prevents bigger problems later.
Simple DIY solutions for small low spots
Most homeowners want the simplest, fastest way to stop puddles—and for good reason. When conditions allow, here’s how we approach small fixes:
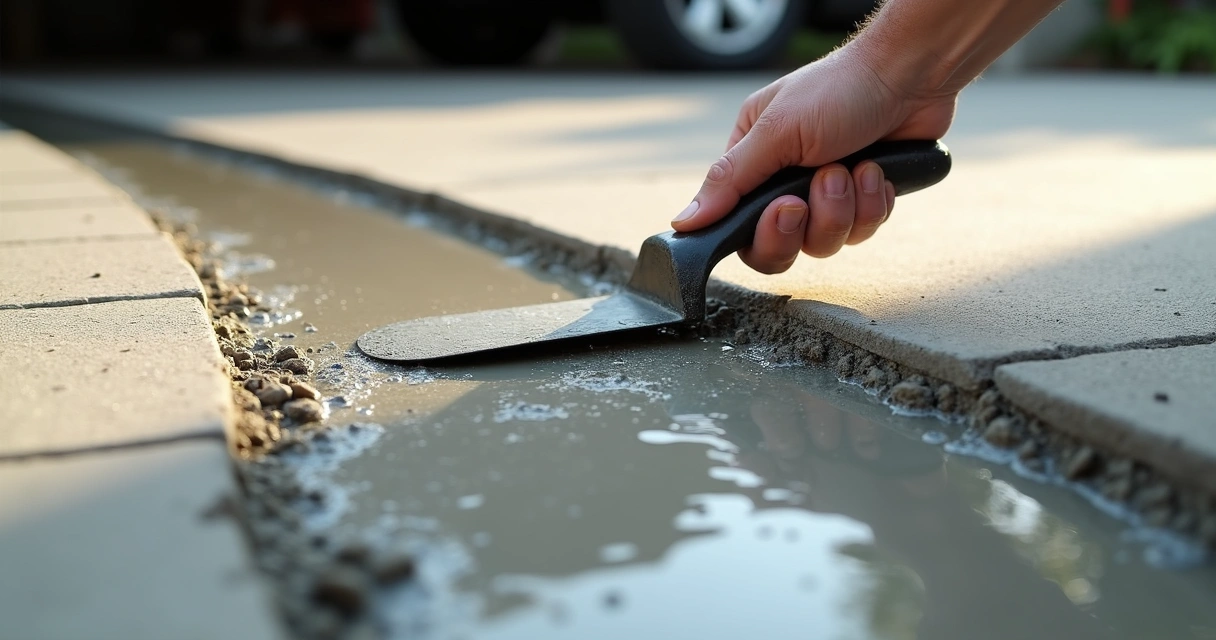
Patching a concrete low spot
- Thorough cleaning: Remove dirt, algae, and any loose material. Power-washing is best. Dry the area fully.
- Surface prep: Lightly roughen the surface with a wire brush or grinder to help the patch adhere.
- Apply bonding agent: Use a concrete bonding primer, so your patch doesn’t just pop loose after the first rain.
- Leveling compound: Mix up a polymer-modified concrete patch or self-leveling skim coat, following package instructions. Pour into the dip and feather the edges outwards. Aim for a smooth, gradual transition so water moves along rather than pooling again.
- Curing: Keep the area moist and shaded as it cures. Avoid using the surface for a day or more, depending on weather and product directions.
detailed patching and correct bonding make sure small repairs last, instead of just masking the symptom.
For stamped or decorative finishes, carefully matching color and texture can make the fix nearly invisible. That’s artistry as much as repair—something our GCM Best Services team enjoys perfecting as part of each job.
Filling a paver or brick depression
- Carefully lift pavers or bricks: Use a paver extractor or two flat screwdrivers. Set aside in order for easy replacement.
- Add bedding material: Sprinkle in fresh paver sand or fine gravel, compacting gently with a hand tamper. Check level with a straightedge.
- Replace the pavers: Set bricks back in their pattern, tapping down with a mallet. Adjust as needed so each is flush with the surrounding area.
- Sweep in polymeric sand: Fill gaps and lock the pavers in place.
On patios and walkways, proper edge restraints and compaction are key to stopping repeats, just as described in tips from long-lasting installations for Florida homeowners.
Self-leveling underlayment for small slabs
For garage floors, interior entries, or new patios with isolated dips, self-leveling underlayments are handy. Just tape off the area, mix the product, pour it in, and let it seek its own level. Fast, clean, effective—especially indoors where a little bump won’t trip up a paver.
Some repairs can really be that easy.
Fixing larger and recurring low spots: drainage and sub-base issues
Persistent or wide low spots mean something underfoot isn’t working. Here’s where we have to ask a few honest questions. Is the soil soft? Are there hidden sinkholes, rotting tree roots, or a broken drainage system at play?
Diagnosing the bigger problem
- Check the sub-base: Peel up a section (if possible) or use a soil probe. Florida soils demand 6–8 inches of well-compacted base for patios and driveways, with crushed stone—not loose sand alone.
- Check for water flow: Observe during heavy rain. Do nearby downspouts, hills, or landscaping direct water toward the low spot?
- Inspect the drainage layout: Is there anywhere for water to go, or has something blocked the original path? Look for clues like algae, mildew, or muddy streaks nearby.
- Look for roots or sinkholes: Probe gently for spongy patches that may signal organic material or voids below the surface.
Per FHWA recommendations on low-cost pavement safety measures, high friction surfaces and proper drainage significantly reduce risk in water-prone spots.
Full repair steps: lifting and resetting
- Remove the affected area: For pavers, lift them gently; for concrete, outline the sunken section and carefully cut it out with a saw.
- Excavate and inspect the base: Remove loose or unstable material. If roots or debris are present, dig them out, refill with well-compacted crushed stone.
- Adjust and compact the base: Build back the sub-base with properly graded gravel or paver sand, compacting every two inches of lift.
- Reset the surface: Reinstall pavers, bricks, or pour new concrete. Feather new edges into old for a smoother finish.
- Seal and cure: For concrete, follow responsible curing practices; for pavers, lock in with polymeric sand and a water-activated binder.
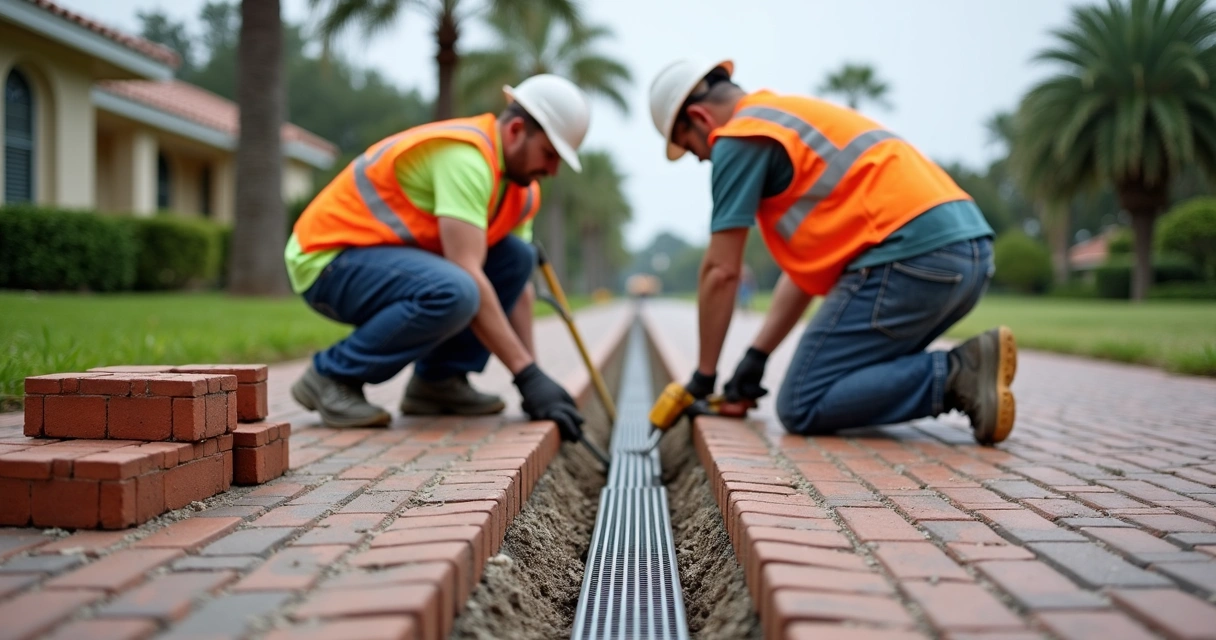
Adding or updating drainage
In some cases, surface adjustments alone aren’t enough. We might install French drains, channel drains, or adjust the overall slope to keep water moving away from patios and driveways.
- French drains: Perforated pipe laid in a gravel trench redirects water underground, away from the surface.
- Channel drains: Grated channels capture surface water and direct it into a system.
- Slope adjustments: Sometimes, the only way is to slightly re-pour or resurface part of the slab so gravity keeps doing its job.
These are the types of corrections we perform on renovation projects or as preventive steps for new builds, always making sure that HOA and municipal codes are followed in Central Florida.
Long-term prevention: keeping low spots from coming back
Stopping low spots before they start is easier than fixing them again later. We always recommend a few habits that can help keep patios and driveways looking good year after year.
- Watch for drainage shifts after heavy rains or new landscaping projects.
- Keep gutters, downspouts, and nearby landscaping in good condition so water is routed well away from hard surfaces.
- Limit heavy vehicle traffic, especially on paver or brick surfaces not designed for load-bearing.
- Fill cracks and seal joints soon after they appear.
- Use high-quality materials and professional prep—studies such as Kentucky Transportation Center’s overviews of pavement preservation support the value of preventative maintenance, microsurfacing, and simple chip seals for longevity.
The Federal Highway Administration has consistently found that surfaces with good friction and correct water management are safer and last much longer.
Choosing the right materials for repairs
Even the smallest patch is only as good as the material underneath it. We only trust solutions backed by engineering, not quick-fix products with big promises.
- Concrete patches: Use polymer-modified or latex formulas intended for outdoor, all-weather patios and driveways.
- Paver sand: Polymeric sand or granite screenings offer better stability than builder’s sand alone for filling and leveling under pavers.
- Bonding agents: Always needed when patching concrete on concrete, they help new material grip to the old.
- Self-leveling compounds: Used indoors or in low-traffic zones, these flowable mixes fill new depressions smoothly.
“Best” is often about matching the repair process to the original material. We stick to this, whether updating concrete, brick, or paver installations. Our process, detailed in installation guides for Central Florida, puts lasting results first.
Safety, code compliance, and warranty: what matters most
Sometimes a DIY repair makes sense, and sometimes it’s risky. Structural settling, repeated water pooling, and code-required drainage grades are issues that can cause trouble if skipped over. At GCM Best Services, our repairs are always aligned to local building codes, HOA rules, and best practices for warranty protection.
- Slip resistance and friction: Research by FHWA shows that high-friction treatments on driveways or walkways reduce slipping and run-off accidents.
- Slope and grade: Most Florida codes require at least 1/4 inch per foot slope away from structures for all patios, walkways, and driveways.
- Documentation: Photos and a written warranty assure peace of mind. We document each step so our customers know their project is in good hands.
When to resurface, replace, or rebuild?
Every so often, a patio or driveway has deteriorated to the point that patching won’t do. Excessive cracks, settled areas over two inches deep, and root-damaged or heaving slabs may signal the end of simple repairs.
- Resurfacing: Concrete surfaces can sometimes be saved by applying a new bonded layer 1/4 to 3/8 inches thick, restoring appearance and slope.
- Replacement: If the base is failing everywhere, full removal and replacement is safer and often more cost-effective in the long run. This aligns with guidance on concrete project planning and maintenance.
- Regrading or rebuilding: For widespread soil or drainage problems, rebuilding both the base and the surface is the most reliable route for decades of trouble-free use.
There’s no one-size-fits-all answer. Each situation is unique, and sometimes a little experience goes a long way in picking the right fix.
Summary: Our process for tackling low spots
- Identify and mark all low spots—big or small.
- Decide if DIY or professional help is warranted based on depth, size, and complexity.
- Use proper patch materials and installation techniques if fixing yourself.
- Address the sub-base and drainage for lasting performance.
- Maintain surfaces regularly to prevent recurrence.
- Never skip local code, safety, or documentation steps.
This patient, methodical approach is what defines our work at GCM Best Services. It’s how we keep patios, walkways, and driveways in Central Florida not just functional, but something to be proud of year after year.
If your patio or driveway has become an obstacle course of puddles and dips, there are solutions—often simpler than you might expect. And if you want professional help, a free quote, or just another set of eyes to check your repairs, we’re happy to lend our expertise.
A good repair is invisible.
Ready for a professional quote? 📞 (407) 250-1948 • 24–48h • Orlando, Tampa & area.
Frequently asked questions
What causes low spots in patios?
Low spots in patios can be caused by poor soil compaction, improper drainage design, water erosion, tree roots, heavy loads, or settlement of the ground beneath the slab or pavers. In Florida, the sandy subsoil and frequent rainfall increase the risk, so deep compaction and design are key from the start.
How to fix low spots in driveways?
For small dips, cleaning and filling with a concrete patch or relaying pavers is often sufficient. For larger areas, check the base beneath, address drainage, and reset the surface material. In all cases, ensure water will now flow away and not pool again. Sometimes, french drains or improved slope are needed to keep driveways dry and safe.
What materials are best for repairs?
Polymer-modified concrete, self-leveling compounds, and polymeric paver sand are best for patching and filling low spots. Always use a bonding primer for concrete-on-concrete repairs and choose materials rated for outdoor, high-traffic use in your climate.
Is it worth it to fix myself?
For very minor low spots and simple paver resets, a careful DIY repair can last. If the area is large, structural, or you’re unsure about drainage and sub-base, professional repair is often worth it for long-term peace of mind. Poor repairs may not last, and could even void home warranties or run afoul of code requirements.
How much does repair usually cost?
Small, do-it-yourself patches may cost less than $100 in materials. Professional repairs typically range from $250 for a small spot to $2,000 or more when sub-base or drainage work is involved. Resurfacing or full replacement increases cost further. Each case is different; we always provide a detailed, transparent estimate up front.